Showing posts with label VGL Cookbook. Show all posts

Monday, January 16, 2017

Pizza! Pizza!..and MiniMichettes!

In a previous post I wrote about making pizza dough from scratch; yes, it is time consuming and takes a bit of upper arm strength to mix the dough but oh, so worth it!  However, one doesn't always have the time or the ingredients or the inclination to start the project, so in comes ready made dough!
Our local supermarket has ready made pizza dough in two forms: a packaged rolled out dough or dough in a bag ready to shape.  We opt for the bag ready to shape and for this blog, we bought three.

First a sausage pizza.  We cooked up a few links of (hot) Italian sausage and breaking into little
Sausage Pizza for lunch!
bits (yes, you must remove the casing from the sausage links).  Let the cooked crumbled sausage cool.  Shred your mozzarella (8oz for 1 pizza) and jack cheese (4oz for 1 pizza).  The jack cheese  melts beautifully with the mozzarella. Open the jar of spaghetti sauce and have some grated parmesan cheese available and you're ready to make pizza!
Here are some basics for beginners:
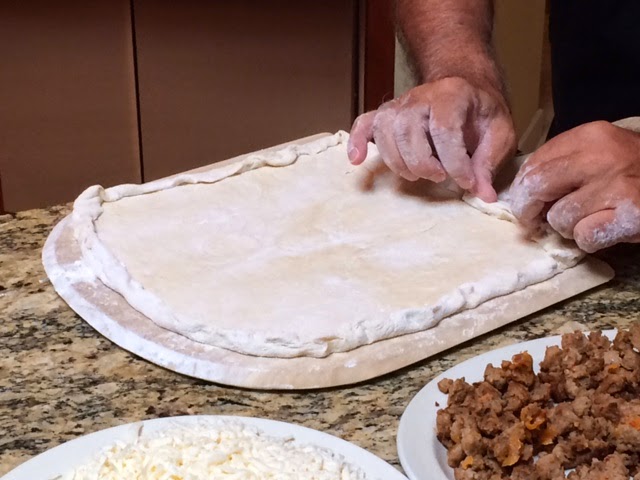
We use a pizza stone for our pizzas, but in a pinch you can use a jelly roll pan (we had to improvise once while visiting family that wanted home made pizza but didn't have a pizza stone). Turn the oven to 425-500 degrees.  Flouring your work surface, place the dough on the counter and begin to stretch out the dough with your hands eventually using the rolling pin.  Roll the dough into a rounded/square shape to fit your pizza peel (or to the size of your jelly roll pan).  Sprinkle seasoned/Italian style bread crumbs to your pizza peel and place your dough on it; the bread crumbs help the dough glide off the peel and onto your pizza stone.  (If using a jelly roll pan, lightly grease the cookie sheet and just place the rolled out dough onto it; no need fro brad crumbs.)
Add your spaghetti sauce (we use jar sauce, our preference is Muir or Newmans marinara or basil) - not too much as one jar can easily cover 2-3 pizzas!  With the back of a tablespoon, gently spread the sauce on the dough.  Give the peel a little gentle shake to make sure it is gliding on the bread crumbs.  Now add your grated cheese (about 2 tablespoons) and sprinkle on the mozzarella and jack cheese.  Give another little gently shake to the peel.  Now add the sausage; another little shake and into the oven and off the peel.  (If you're using the jelly roll pan, just follow the instruction without the gentle shake!)  Check on the pizza in 10-12 minutes to see if the back is cooking faster than the front, if so, rotate the pizza.  The pizza will have a firm enough crust that you can turn it on the stone. (Rotate the jelly roll pan if the back is getting more done that the front.)  Pizza should be done in about 15-18 minutes.  Slide onto pizza pan, let cool a little and serve it up!

For a white pizza:  Same oven setting.  Pizza stone or jelly roll pan.
4 oz mozzarella shredded, 8 oz ricotta cheese, 2-3 heaping tablespoons parmesan cheese, 1 egg, Salt & Pepper to taste = mix well together in a bowl.
Sprinkle bread crumbs on the pizza peel.  Place stretched out dough on peel or jelly roll pan.
Needed to stand guard a little sooner!

Prick the dough several times with a fork and brush entirely with olive oil.  Glide pizza dough onto the stone (or place jelly roll pan in the oven).  Bake until lightly golden brown. Remove from oven.  Spread the ricotta/mozzarella mixture on the pizza.  Return to oven and bake a few minutes (5-8 minutes).  Turn oven to broil.  Now, slide the pizza onto a pizza pan and move the it under the broiler - stand guard!  Remove pizza as soon as you seen the some golden bits of cheese!  (If using a jelly roll pan, just move the pan from oven to broiler and watch carefully!)  Remove, cool and serve!  For a special treat, drizzle a little truffle oil on the pizza!

Mini Michettes - what a surprise these are!  First discovered in Antibes, France these little stuffed bites are so easy to make!  We've stuffed them with cooked (crumbled) sausage & swiss cheese, and most recently with just the swiss cheese.
These are stuffed with Swiss cheese
Have your filling ready: could be sausage and mozzarella, swiss cheese, swiss cheese and (cooked) spinach, chorizo or pepperoni with parmesan  (Cheeses are shredded, not more than 4 oz needed, sausage one link, spinach handful cooked down.)
Set oven to 425 degrees
Roll out your dough, on parchment paper, into a rectangle - as best you can - with the widest edge in front of you.  Carefully sprinkle your filling/stuffing along the wide bottom edge of the dough.
Gently roll from the bottom, making sure it's even as possible.  When you have rolled it completely, get your sharpest knife and cut the roll into 1+ inch pieces (mine are usually 1 1/2 inches).
Now, take each piece and stand on it's side so you can see the roll/pinwheel). Glide the parchment paper with "side standing" pieces onto the peel - or onto cookie sheet.  Place in oven to bake about 15 minutes or until golden.   Remove from oven and serve at room temp or slightly warm.  I will freeze my batch and take out one or two per person to serve with a meal instead of bread!

As you may know by now, I am a great believer in baking or cooking in volume and freezing for an extra meal or two later on.  When my husband makes pizza, it's usually two or three at a time.  We freeze the slices and have them for lunches or, sometimes after a big lunch, for dinner.  As for the mini michettes, we have one each with our pasta dinner - always nice to have a little bread to "mop up" the sauce/gravy!  The added flavor of the filling is a treat.

Note:  When we first discovered these in Antibes, the fillings were more than a dozen:  mushrooms with cheese, goat cheese, tuna, spinach & cheese, cheese (and there very several varieties), chorizo, and more.  We recently tried to use pepperoni but it is too hard despite having been cut into tiny cubes.  Maybe shredded would have worked, but too much trouble for the uncertainty.  Found the swiss was easiest and tastiest to work with, but am sure if we tried with mozzarella and parmesan it would be a hit - especially if brushed with a bit of melted butter with minced garlic before baking! Mmmmm.....
So, what will you try?




Thursday, February 25, 2016

Spanish Wines - Ole'

Since spending time in Spain, one tends to do as the locals do and sip a glass of wine and watch the world go by....just like in France.  But what to drink?

Being new arrivals to Spain, the need to explore the the wines seems like an important task - because it is!  The only Spanish wines I knew were Freixenet Cava (sparking wine) and Rioja wines, from the NE section Spain.  However, Spain is large country and many areas produce wine:
Jerez (sherry), Rioja, Ribera de Duero, Jumilla and Rueda just some of the regions I've sampled so far.  With more than 70 wine producing regions, there's a whole lot of sampling that still needs to be done!

Rioja Wine - Some of these vines came from Bordeaux region of France (read the label on a bottle of Rioja wine from wine maker Marques de Riscal).  The Rioja wines are an excellent alternative to Bordeaux wines.  These are full bodied red wines and I absolutely love them!
Try:
Marques de Caceres, Campo Viejo, Juan Gil and Ramon Bilbao - all under $20 a bottle
For something I thought was a little lighter, I enjoyed the Marques de Riscal Proximo.

But red wine isn't the only wine made in the Rioja.   The region produces beautiful white Rioja wines, too.  Well worth trying these dry wines; served chilled, it is perfect for enjoying alone or with a meal.

And Rioja isn't the only region to make whites!  Countless other wine regions throughout Spain make delicious whites.  For example, the Verdejo grape from the Rueda region makes a great refreshing, dry white.  I rather much enjoy the whites from Rueda! Again, the cost for these are very easy on the wallet and very tasty on the palate!

Of course, many of us know the sparkling wine (Cava) Freixenet.  This winemaker makes several varieties of the "fizz" and they just keep getting better and better! There's Cordon Negro (Brut=dry),
Cordon Negro Rose' and Carta Nevada (Brut)....great sparkling wines to celebrate anything and everything!

Wines in Spain are rated as follows:
Classification:
DO covers about 70 regions
DOC only the two regions of Rioja and Priorat

Aging:
Vina de Mesa (table wine) and Vino de la Tierra (country wine)
Crianza - aged minimum of 2 years (with a minimum of 1 year in oak barrel)
Reserva - aged minimum of 3 years (with a minimum of 1 year in oak barrel)
Gran Reserva - aged 2 years in oak and 3 years in the bottle
Try:
The Campo Viejo Gran Reserva is about $22 a bottle
Muga Especial Reserva is about $35

Take a trip down the Spanish wine aisle of your local wine shop.  Our "Total Wine" shop carries a great selection of Spanish wines, so it makes it real easy to try new varieties and enjoy a lazy afternoon!  Hope you have the chance to try some of the suggestions!

Enjoy!


Thursday, January 28, 2016

"Madeline" Banana Bread


 I'm looking at all my bakeware and thinking it's the new year and want to make some changes....  Not wanting to give anything up, I decided a little bit of something sweet will satisfy the craving and dampen the urge to binge if I deprive myself.  Little "sweets" would do the job....but even mini-loaves could be too tempting; I need better portion control.  Enter the madeline pan*!  These delightful little molds will make the perfect little taste of sweetness I tend to crave after dinner.

I decided on a banana bread because I had 6 baby bananas that had started to ripen, black spots and all.
A quick survey of the pantry and found all that I needed: flour, light brown sugar, white sugar, salt, baking soda, butter, cinnamon, eggs and vanilla extract.  I was feeling a little lazy and didn't want to use the mixer, so I did it by hand.  You'll need two big bowls, two soup bowls, whisk and spatula.

Here is my recipe:
Preheat oven 350 degrees 
Butter/grease madeline molds

Mix together in a bowl and set aside:
1 1/2 cups flour
1 teaspoon baking soda
1/4 teaspoon salt
3/4 teaspoon cinnamon

2-3 large ripe bananas (I used the six little ones I had), mashed in a shallow/soup bowl and set aside

In a large bowl:
2 eggs - beat/whisk
THEN ADD IN and vigorously whisk:
1/2 cup salted butter, melted and cooled
1/2 cup light brown sugar (packed!)
1/4 cup sugar
1 teaspoon vanilla extract

Now, add in the mashed bananas
Whisk, whisk, whisk

Finally, add in the dry ingredients and using a spatula, blend, blend, blend!

Drop a rounded (not overly heaping) Tablespoon of batter into each mold.
Bake mid-oven, 25-30 minutes.
When done, remove from mold and cool on wire rack.
When cooled, place the golden colored madelines into a freezer bag and freeze.
When I am ready to have a little sweet after dinner, I remove one from freezer and let it defrost a few minutes - for me, a perfect little dessert!

Filling the madeline molds
* I bought mine at Bed, Bath & Beyond

Tiny madeline banana breads ready for the freezer
I cut one in half and you can see the delicious dark "bread"


Friday, January 16, 2015

VGL Cookbook - Shrimp Asopao

Asopao (ah-sew-pow) is a delicious Puerto Rican dish...it can be made with chicken or shrimp or whatever, but my favorite is with shrimp!  Other Caribbean islands may make it, but I've only had the Puerto Rican version - which to me is the only version!  Not quite a soup, not quite a stew but somewhere inbetween....and oh so good!

This recipe easily feeds 6-8 people and is a one pot meal - even more attractive!
Be sure to have the all the ingredients before you start - like the Sofrito! (enter sofrito under "Search My Blog" to get the recipe!)

18-24 shrimp (no tails, cleaned.  I used frozen shrimp from our fish market, defrosted)
(lightly season shrimp with a little salt and pepper)
(use 5-6 of the shrimp and cut into small pieces to use in step #1)
Have a pot of water simmering with 2+ quarts of water

Step # 1
*1/2 Green Pepper - diced into small bits
*1 onion - diced into small bits
*3 good sized garlic cloves (minced; I used a garlic press)
*3 Tablespoons (approx) of olive oil
*1/4 teaspoon of black pepper
*1 heaping Tablespoon of chopped parsley (I buy a bunch, chop it and freeze it; makes life easy)
* the cut up shrimp (goes in last, after onions have cooked down)
          In your stock pot, add the oil and the green pepper, onion, minced garlic, pepper and parsely.
Under low heat toss frequently to prevent burning; when onions are translucent, add the chopped shrimp.  Cook a minute or two or three...

NOW:
Step # 2
**15 oz can tomato sauce
**2 1/2 cups uncooked rice
**2+ quarts of water in a separate pot, simmering (you'll use this in rations)
**15 oz can of seafood stock
**1 heaping Tablespoon of salt
**4 oz jar of diced pimientos
**1/3 - 1/2 cup frozen peas
**2 cubes of sofrito (frozen or defrosted)
** 1 heaping Tablespoon of capers (try not to use any of the liquid)
**Remaining whole shrimp (they go in at the end when the rice is just about cooked)
          To the green pepper & onion mixture add the tomato sauce, stir well, add the rice and stir.
Add 2 quarts of warm water (I dipped my Pyrex measuring cup into the warm water)
Add the salt, the pimientos, frozen peas, capers and the sofrito (I dropped my in frozen)
Keep stirring and stirring - rice will want to settle down and possibly stick.  Keep it movin'!
About 10 minutes into the cooking, stir in the seafood stock. Taste it...it should smell very good and taste like it's going to be a great meal!
Now the rice has been cooking about 20 minutes - add the rest of the shrimp and cook another 5-8 minutes or so until the rice is tender and looks like it has doubled in size and shrimp are cooked.

Serve in large bowls and enjoy! Oh-my-goodness -or- Ay Dios mio!


Saturday, January 10, 2015

VGL Cookbook: Sweet Potato Hash Browns

I always associate sweet potatoes and/or yams with Thanksgiving.  It was a vegetable that we ate sliced, sprinkled with a light brown sugar, topped with butter and baked to sweet perfection.  But that was it.  I've had sweet potato fries, but that is about as different a variation as it has been....until now.

Watching an episode of "Chopped", one of the ingredients was a sweet potato.  Contestants were school chefs/cooks and had to prepare meals that kids would like but were good for them.  One chef made a sweet potato hash brown (but hers came out like a little cake).  I made a mental note that I still had a sweet potato left over from New Year's turkey dinner.

A few days later, looking to make a different side dish, I remembered the sweet potato!  (They stay very well)
I grabbed the shredder and began....

1 medium sized sweet potato - grated (I used the old style box grater)
1 small onion - chopped (small bits)
1/4 +  teaspoon salt
1/4 +  teaspoon pepper
2 Tablespoons olive oil
2 Tablespoons butter

First, peel the sweet potato
Then grate it
Now, in a large frying pan, add oil and butter, low heat to melt butter
Salt and pepper the shredded potato and toss about to season throughout
Sprinkle the seasoned shredded sweet potato into the frying pan and cook 5-10 minutes
Let it get a little golden brown on the bottom and then, with a spatula, toss/turn over and keep
moving the hash browns until tender and slightly browned.

The sweetness of the potato, the flavor of the onion mixed with the salt and pepper made this quite the
surprise side dish that evening.  In fact, the review was so good, the request was: "please, make it again"!

It was so simple to make - so colorful on the plate - so delicious to eat!  Try It!

PS - That evening's meal was chicken cutlet (pounded down) with a slice of prosciutto and topped with shredded Manchego cheese, rolled up, secured with toothpicks (2) and sauteed in olive oil and butter until light golden brown.  Then I added a cup of chicken broth, covered it and let simmer for 5 minutes.  Meanwhile the green beans were cooked with a sliced clove of garlic and served with a basil flavored olive oil!  Mmmmm

Sunday, July 20, 2014

Recipe: 'Spaghetti with Scallop & Chorizo

Interesting what you can create when you've not planned a meal, haven't done a food shop for a few days and you're hungry.  Such was the case the other day; went through the cabinet and found a box of spaghetti.  Rummaged through the freeze looking for a surprise and found two: a small reserve of frozen scallops and a half bag of broccoli.  Searched the fridge and found a chorizo.  Hmm...scallops, chorizo, spaghetti and broccoli
And this is how it went together:

Cooked Chorizo
1 chorizo sliced and then quartered
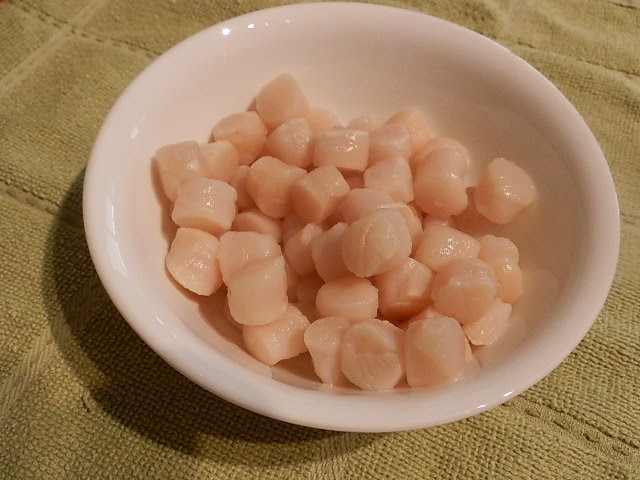
1/2-3/4 lb of frozen scallops
1/2 lb spaghetti
Serves 2-4 (depending on portion sizes)
Broccoli or any veg you want


Defrosted Scallops
First rinse/defrost the scallops - don't let them sit in water.  Just keep running water over them & constantly drain
Now, set the water to boil for the pasta
Next cut the chorizo
Frying pan, medium heat cook the chorizo until beautifully browned
(Is the water boiling yet?  Add the spaghetti and cook as directed)
Remove the cooked chorizo, keep the flavorful oil!
Add the scallops to the frying pan with the chorizo oil and cook
Remove the scallops, keep the flavorful oil!
Add back just before pasta is done
Lower heat on the frying pan to the lowest setting while waiting for the pasta to cook.  Start cooking the broccoli.
When the pasta is just about done, turn up the heat on the frying pan to medium again
Add the chorizo and scallops back to the pan and move to the side so you can add the pasta
Drain the pasta and add to the frying pan
Drain & plate broccoli
Toss and turn the pasta in the frying pan, a few strands will get crispy while absorbing that fabulous color!

Plate the pasta first, then scoop the chorizo & scallops on top of each.
Serve the broccoli with a bit of olive oil and you've got a great meal!

Enjoy!

Fifi

Monday, July 7, 2014

Recipe: Broccoli Soup

This has got to be the easiest & fastest soup to make!  We'd just arrived home and needed to make a light meal...not much available but just enough to prepare this delicious soup!  The potato thickens the soup, the shallots add a subtleness and the blue cheese, well, that is the surprise "pop" of flavor!  Wow!

What I used for 2 servings:
1 bag of frozen broccoli florets (just about a pound)
3 shallots
1 medium potato (peeled, and cut into medium sized chunks)
Salt & Pepper
1 Tablespoon Olive Oil
Wedge of Blue Cheese (you can use Gorgonzola) (you can use crumbled blue or Gorgonzola cheese)


In a large pot, salt the water and bring to boil.
Cut the potato, dice the shallots
When the water is boiling, add potato chunks and continue to gently boil
Take out bag of frozen broccoli florets (or cut up fresh head of broccoli)
Add olive oil to a small frying pan, medium heat, add shallots
Cook shallots until tender - remove from heat, set aside
Add broccoli to boiling water (with the potatoes)
Boil for about 4 minutes - until potato & broccoli are just soft (not mushy)
Drain potato & broccoli BUT RESERVE SOME OF THE WATER
(it has lots of vitamins and we'll need some!)
In a blender, or in a bowl using an emulsifier, add the potatoes, broccoli and shallots
Add about 1/2 cup of the reserved water, salt & pepper to taste - puree it all together.
If too thick, add small amounts of water - be careful not to make it "runny"!
Return the puree soup to stove top and reheat (it should not need much time at all)
Serve into two bowls
Garnish with a thin wedge of blue cheese (or Gorgonzola); crumbled blue cheese works well, too
Enjoy!
Fifi
Potato & Shallots

Frozen Broccoli Florets

Garnish with blue cheese


Monday, June 30, 2014

VGL: Recipe for Chicken, hummus & chorizo

Ever wonder what to do with all the hummus that you buy or make?  A chef found an answer!
Somewhere in my dining travels I had delicious dish with an interesting twist: hummus and chorizo.  My dish was a baked fish served atop a mound of warm hummus that was garnished with chorizo (and it's delicious oil).  I just had to try this at home....

Today we had baked chicken legs but you can use anything: chicken breast, pork chops, fish etc.
Season your meat/fish as usual and cook
Just before your meat/fish is done, warm up the hummus on low heat..
Now, slice a piece of chorizo (I used slightly less than a 1/2 stick) and cook until crispy (it doesn't take long at all).
Remove chorizo from frying pan; reserve the flavored oil.

Get your plates ready:
Spoon some of the chorizo oil onto the center of each plate
Place a dollop of the warmed hummus in the middle of the plate (over the chorizo oil)
Carefully place the chorizo bits around the hummus
Gently arrange your meat/fish atop the hummus and enjoy!

Serve with a side of salad and a few of the vanilla cookies for dessert!  Oh la la!
Fifi

Saturday, June 28, 2014

Recipe: Vanilla Cookies

I have no desire to bake while I am in France - why would I when there is a great bakery on every corner (sometimes there are two bakeries on every corner!)...however....
All those Vanilla Beans!

While we were in Grasse having lunch, we were offered a bundle (and I mean a bundle!) of vanilla beans for 20Euros ($25) - too good an offer to pass up especially since I could smell the vanilla without opening the packaging!  On the ride home thinking of what to make, I thought of cookies.  A stop at the supermarket before heading home to pick up just a few things...

This recipe will make about six dozen 2-inch cookies.
In one bowl:  3 1/4 cups all purpose flour
                     1 1/2 Tablespoons Baking Powder

In mixer bowl:  9oz softened/slightly melted butter
                       2 cups "sugar in the raw" (less sweet than white sugar)

Evening cup of tea & cookies
On the side:  3 Egg Yolks
                    2 Eggs
                    1 teaspoon lemon (or orange) extract
                    4 Vanilla Beans (ready to be cut and 'seeded')
                    1 cup almond flour
                    Almond, walnut or any nut for toppings (optional)
                    1/4 cup "sugar in the raw" for topping (optional)
                    Baking Sheet, Plastic Wrap

1.   Blend the flour and baking powder, set aside.
2.   MIXER: Mix sugar and butter until very well blended slightly fluffy
(I did not have a mixer here, so I used a whisk and really gave it a go!)
3.   Add the eggs slowly and mix well into the butter-sugar batter
4.   Add the lemon extract, mix well into the batter
5.   Scrape the "seeds" from the vanilla pods and blend into the batter
(place the de-seeded pods into your sugar bowl for a flavored treat!)
6.   Slowly, slowly add the flour/baking powder and the almond flour.
(A little almond flour, a little regular flour, etc etc etc)
7.   When the flours are fully incorporated into the batter, set aside.
8.   Cut three large pieces of plastic wrap; place equal amounts of batter onto each
9.   Wrap the very soft batter loosely and gently pat down to make a flattened package.
10. Place in refrigerator for at least 4 hours.
11. When ready to start baking, preheat oven to 350 degrees
12. Unwrap the firm dough and lightly flour both sides and the rolling pin
13. Gently roll the dough down to a 1/4" thickness and begin cutting out the cookies
14. Use all the dough, as you get scraps, roll them into a ball, flatten out and cut more cookies
15. Place a nut atop each cookie and sprinkle with the tiniest bit of sugar (Optional)
16. Place on baking sheet and bake, middle rack, 14-15 minutes
Made too many cookies?  Freeze them! Share them!  Give a gift of freshly baked cookies!

Enjoy!
"Fifi"

Friday, June 6, 2014

Recipe: Pomme au Feu (Baked Apple)

This has got to be the easiest, most delicious dessert ever!  My husband had this dessert in a local restaurant in Antibes and I could not wait to get home to try it out myself.  The dessert looked simple enough: an apple that had been baked, smelled like apple pie, and had the consistency of home made apple sauce.  I searched around for a few recipes on line and then came up with my idea as follows:

Serves 1  ( for more servings, just increase the recipe per apple!)
Prep Time:  15 minutes
Bake Time: 35 minutes
Preheat oven to 375 degrees

1 GOLDEN DELICIOUS APPLE
(these are best, the skin is firm but not hard and the inside is deliciously tender)
Core the Apple - need to remove the center core & seeds all the way down

1 Tablespoon of Sugar in the Raw (don't over fill the spoonful, in fact, just under a full Tablespoon!)
(don't use white sugar, it is too sweet)
1 teaspoon of cinnamon (again, slightly less than a full teaspoon)
1 Tablespoon of butter (I used lightly salted)
Honey for drizzling (optional)

Blend the sugar and the cinnamon
Dice the butter (keep each Tablespoon of butter separate per apple if baking more than one apple!)
Place the cored apple onto a square piece of aluminium foil (use individual sheets for extra apples)

Stuff a few cubes of butter into the cored apple, spoon in the sugar/cinnamon, finish with the rest of the butter
Wrap up the apple but leave a tiny gap at the top for the steam to escape while baking.
Place on baking sheet and bake for 25 minutes/375 degrees  mid-oven rack
After 25 minutes, open oven and pour or squeeze/drizzle a little bit of honey into the foil opening over the apple core - (carefully spread the foil open a little bit to help get the honey into the apple center)
Continue baking for 10 minutes
If you don't want to add the honey, just bake for the 35 minutes

After baking, remove tray from oven and carefully open the foil and with a spatula or very large spoon gently place the apple on the plate and serve with a scoop of vanilla ice cream!

From start to finish it is less than an hour - this dessert baked while we were having dinner - and it smelled wonderful!  Best served warm right from the oven!


Sunday, May 4, 2014

Recipe: Almond Cookies with Pine Nuts

I thought to try my hand at baking these cookies...I had plenty of almond flour left in the cupboard and thought I should try something new. So here it goes:

3 1/4 cups Flour
1 1/2 Tablespoons Baking Powder
1 1/2 teaspoons Salt
2 sticks plus 2 Tablespoons of Butter - soft/room temp
2 cups Sugar
3 egg yolks
2 eggs
1/2 teaspoon Lemon Extract
1/2 teaspoon Almond Extract
1 cup Almond Flour
1 1/2 cups Pine Nuts (or 3/4 cup sliced almonds)

Parchment Paper
Cookie baking sheet
Small round "biscuit" cutter
Rolling Pin and extra flour for dusting

In a medium bowl blend Flour, Baking Powder and Salt (set aside)
In the mixer bowl add the butter and sugar and beat medium speed until it is fluffy (2-3 minutes)
Reduce mixer speed to low.
Add all the eggs, then the lemon and almond extracts.
Beat low speed until well blended.
Slowly add the flour (maybe one cup at a time)
Slowly add the almond flour
Blend well, low speed.
It is a very creamy, gooey dough...

Place a long plastic wrap on the work surface/counter and pour/scrape all the dough onto the center of the plastic wrap.
Let it spread out naturally and wrap it in the plastic wrap.  Carefully slide the dough onto a tray and refrigerate 4 hours or overnight.

After the dough has chilled, get ready to bake!
In a non-stick frying pan, lightly brown the pine nuts. (If you are using sliced almonds, skip this step!)
Set the lightly browned pine nuts aside to cool.
Preheat oven to 350 degrees
Line cookie sheet with a piece of parchment paper
Cut a long piece of parchment paper for your work surface/counter.  Dust with flour.
Remove the plastic wrap and place the dough on the paper and gently begin to roll out.
I cut my dough in half and place the other in the 'fridge (re-wrapped) until ready to use. Otherwise it gets too soft to work with.
Roll dough to about 1/4" thickness and begin cutting out round circles.  (My cutter is about 2" in diameter.)
The cutter works best with cold, firm dough.
Assemble your cookies onto the baking sheet.
You may end up with little bits and pieces of dough, it will be very soft - so take a small handful of dough pieces, roll it into a ball, place on baking tray and press down to form a cookie and top with nuts.
Place a few toasted pine nuts (or sliced almonds) on top of each cookie
Place in oven - middle rack - and bake 15-20 minutes - just until the edges start to brown.  
If your cookies are thicker, you'll need 20 min, it you make small cookies, 15 min may be just right.

Repeat the same procedure with the remaining cookie dough in the 'fridge.
The recipe makes about 48 cookies!
Mix butter & sugar until fluffy

Lightly brown the pine nuts

Place on sheet, top with nuts

Bake, Serve & Enjoy

Sunday, April 27, 2014

Recipe: Homemade Pizza!

There is nothing like making your own pizzas - from scratch!  It's fun, it's inexpensive and you know what ingredients are going into your pizza pie!
When my husband makes pizza, he makes enough for 6 pies - we eat a whole one (six slices) and we freeze the rest. We cut the pizzas into 6 (almost) equal slices and freeze them in packs of two.  They make for great lunches or a light dinner.  The recipe below is for 3 pies!  I also have a separate video link with step-by-step photos.
We have a ceramic pizza stone (we bought it at Williams-Sonoma), a pizza peel (Bed Bath & Beyond) and a plastic pizza cutter (also BB&B).  I picked up pie trays at various clearance/outlet centers and the $7 one is just as good as the one we paid $20!
What you need:
Pizza stone
Pizza peel
Pizza cutter
Rolling pin (French rolling pin is our preference)
Large bowl for mixing
Large bowl for resting/rising
Plastic/cling wrap to cover dough while resting/rising
Pizza pans for slicing/serving
Thermometer to register water temperature
Small bowl and brush for brushing pizza crust when it comes out of oven
1 kitchen towel: first to cover the dough while resting, afterwards dampened to cover the risen dough

Here's the recipe for 3 pies:
1 package fast acting or rising yeast
1 1/2 cups warm water (not hot or it will kill the yeast! Use a thermometer)
3 1/2 cups all-purpose flour (we use King Arthur All Purpose Flour)
1 Tablespoon olive oil  PLUS EXTRA: to grease a large bowl and some for brushing on crust
1 pinch of salt
2 teaspoons garlic powder
2 teaspoons onion powder
32oz  jar tomato sauce (we use Muir Glen "marina" - you'll only use half the jar)
16oz package of Mozzarella cheese - shredded (divide into 3 portions)
8 oz package Jack cheese - shredded (divide into 3 portions)
6+ Tablespoons of grated Parmesan cheese (figure 2 per pizza)
sausage or pepperoni or other topping of your choice (divide as desired)
**
Very fine ground cornmeal or semolina (for dusting the peel)
Small bowl with olive oil and a brush - for brushing crust when out of oven


  • Arrange all your ingredients
  • IF you are using sausage as a topping, cook it first and let it cool down (1/2 lb should be good)  (If you want to use mushrooms, cook them ahead and cool down as well.)
  • IF you are using pepperoni, cut it up and have it set aside
  • Heat the Water (use cold bottled if possible) in  microwave (check temp with a thermometer: 110-115 degrees), add the yeast and let activate 5 minutes
  • After the 5 minutes, add 1 Tablespoon olive oil to the water/yeast
  • Spread some extra olive oil in a very large bowl, set aside
  • In a large bowl, place the 3 1/2 cups flour 
  • Add the salt, garlic and onion powders - gently blend into the flour
  • Make a well in the flour
  • Slowly pour small amounts of the water/yeast into the flour and blend using wooden spoon
  • Add all the water/yeast and work it into a smooth dough (use a wooden spoon)
  • Work the dough for 10 minutes; it helps to have another person help you with the mixing!!
  • Place in the oiled bowl, cover tightly with plastic/cling wrap, drape a towel over that
  • Let rise 1 1/2 - 2 hours in a warm area, away from A/C or draft
  • Place the pizza stone in the oven, bottom rack; remove all other racks from oven
  • Preheat oven to 500 degrees
  • After 1 1/2 - 2 hours, dust your counter with flour and turn the dough onto the counter
  • Punch down and begin to shape into a log (don't over work the dough)
  • Dust the dough with just a bit of flour to prevent sticking to the counter and your hands
  • Cut the log into 3 equal pieces (we use a tape measure to help guide us!) 
  • Dampen the towel used to cover the rising dough 
  • Lightly cover the cut dough pieces with the dampened towel (keeps them from drying out)
  • Begin with piece #1 and roll (with a rolling pin or your hands) into a flat disk slightly larger than your pizza peel.  (Be sure to dust your hands and the rolling pin with flour first!!)
  • Sprinkle the finely ground corn meal (or semolina) on the peel - this will help the dough 'slide' off and onto the stone
  • Gently place the dough onto the peel and tuck up the edges to form a ridge/crust
  • Gently give the peel a shake to make sure it doesn't stick to the peel
  • Use about 3-4 tablespoons of tomato sauce and gently spread it on the dough - not too much, it'll get soggy and the dough won't slide off the peel!!
  • Give the peel another gentle shake to be sure it is gliding on the peel
  • IF you are adding sausage or pepperoni, add it on now 
  • Sprinkle 2 Tablespoons of grated Parmesan cheese, 1/3 of the Mozzarella cheese,1/3 of the Jack cheese
  • Gently give the peel a shake to make sure it is doesn't stick to the peel
  • Bring the peel to the oven, place towards back of stone and gently shake/shimmy the pizza onto the stone as you gently pull the peel back with every little shake/shimmy.
  • Bake approximately 15-20 each
  • While pizza is baking, start on the next pie
  • Repeat
  • When the pizza is ready to be removed from oven, use a fork and glide the pizza onto your pizza pan.
  • Brush the crust with olive oil (it gives it a golden color!)
  • Let cool a bit and then cut pizza into 6 (almost) equal slice
Have fun...here are our pictures of pizza making with our friends!  We had a pizza making party and we toasted a successful event with Proseco!  Ciao!


Friday, April 11, 2014

Recipe: Blackened/Seasoned Pork Chops

I've mentioned before how terrific Emeril's Essence Seasoning Mix (http://www.food.com/recipe/emerils-essence-5031) is for almost anything.  I've shared recipes using it.  Well, here is another!

Friday, March 28, 2014

Recipe: Onion Confit (Preserve) with Chorizo

This is simple Spanish tapas recipe full of flavor.  The recipe comes in two parts: cooking down the onions and then cooking up the chorizo.  You can cook the onion confit and refrigerate for a few days: use some of it with the cooked chorizo, save some to top your burgers/pork chops or steaks, or even spread on bread!

Tuesday, February 25, 2014

Recipe: Easy Beef Stew

Easy Beef Stew...the title says it all!  I've been searching for something new to make while keeping it low carb.  There more than a handful of recipes called for 1 cup of red wine, carrots and potatoes - but, most importantly, what to do with the rest of the bottle when you are on a low carb "regime"!!  This is a great recipe to do on a "house chores" day.  Once you set it on the stove, you don't have to mind it for at least 3 hours!


I thought about a beef stew while I was food shopping yesterday and picked up a few items for the meal:
  • 1 rib-eye steak (about 3/4lb) I cut it into small cubed pieces
  • 1 bag frozen cauliflower (used the whole bag for the "mash")
  • 1 bag frozen small peas (used 1/2)
  • 1 bag frozen sliced mushrooms (used the whole bag)
  • 1 bag frozen pearl onions (used 1/2)
  • FROM THE PANTRY I HAD:
  •  1 Tablespoon Olive Oil
  • 1-2 Tablespoons Butter plus 2+ Tablespoons for Cauliflower Mash
  • 1 cup water (room temperature)
  • 1 Beef Bouillon cube
  • 1/4 c flour  (add salt & pepper to taste)
  • 1 Tablespoon tomato paste (I use Cento; it comes in a squeeze tube)
  • 1/2+ teaspoon "Essence" (Emeril's blend gives it a spicy "kick")
  • 1/3 cup milk (for Cauliflower Mash)
  • 1/3 - 1/2 cup grated Parmesan Cheese (for Cauliflower Mash)
I know, I know...frozen veggies?  But in a pinch, or when time is of the essence, they come in handy.  I knew that today would be a busy day for me so I was prepared.
  1. First, add the olive oil and the butter to a large sauce/saute/fry pan with a tight fitting lid (this is very important).  Low/medium heat on stove top.  (I had 1/2 onion left over from lunch, so I finely chopped it and added it to the oil/butter.  This is optional.)
  2. Next, put the 1/4 cup flour (seasoned with salt and pepper) in a baggie, add the beef and lightly coat the meat.  (Most of the flour will remain in the baggie, so don't worry about the carbs.)
  3. Now place the meat in the pan and lightly brown the meat - turn up heat to medium.  Don't cook it dark brown; just lightly cooked.
  4. Add the tomato paste, pour in the water, drop in the bouillon cube.  Stir well, add frozen mushrooms and cover.
  5. Watch carefully until it has a rolling simmer.  Reduce heat to lowest setting.
  6. Let cook, slowly, on low heat for 3 hours.
  7. After 3 hours, add the pearl onions and the peas. Gently stir, cover and let cook 1 hour more.
  8. When 15 minutes before serving, bring another sauce pan to boil with a bit of salt, empty the frozen cauliflower into the boiling water and cook until tender (4 min??).
  9. While that is cooking, get blender/food processor ready with the butter, grated cheese and milk.  Give a quick mix to blend it all.
  10. Drain the cooked cauliflower and add 1/4 of the cauliflower at a time.  Pulse/Mix.  Add the next 1/4 amount and pulse/mix.  Do the same for the remaining amounts.  (The cauliflower is steaming hot.  Be sure when pulsing to open the top just a tiny bit to allow the steam to escape each time you add the cauliflower.  This is important.)
  11. Blend well until it is the consistency of mashed potatoes
  12. Turn off stove; serve up the stew meat and place a few dollops of the cauliflower mash atop each serving!  Serves 3-4.
While I cannot say it is carb free, it is a low carb meal in my book!
Enjoy!   Fifi


Recipe: Fresh Pasta

Just before the Christmas holidays we had set aside one day for making fresh pasta.  A few years ago we purchased a hand crank pasta machine; cost was under $30.  In the past we made pasta more than a few times, but could not get the pasta dough just right.  Each time we tried a little more of this, or less of than and finally we hit it just right!  So practice does make it perfect and here are the recipes for fresh pasta:
For Spaghetti: 1 cup semolina, 1 cup flour, 2 eggs, 1 egg yolk and 1/2 teaspoon salt.
For Ravioli/Manicotti: 2 1/3 cup flour, 2 eggs, 4 egg yolks, 1/2 teaspoon salt. (Filling: 8oz ricotta, 4 oz shredded mozzarella, 1 egg, salt and pepper to taste.  Finely chopped parsley is optional!  Mix very well.)
Either recipe:  sift the dry ingredients together.  Make a round mound of it and then make a crater in the center (looks like a volcano top). Crack the eggs and yolks into the crater and slowly break the yolks and gently whisk the eggs with a fork, slowly incorporating a little bit of flour as you whisk.  When you've blended it all to a crumbly mixture, use your hands mix all the remaining flour into a dough.  (If you cannot get all the flour to become "dough-y", add a tablespoon of water.) Knead the dough for about 10 minutes: fold over, push with the heel of the your palm; 1/4 turn and fold over and push, keep repeating this until the dough is smooth.  Plastic wrap the dough and let rest an hour.  Set up your pasta machine and go!  The pasta machines include instructions on how to run the dough through the machine to make the spaghetti or the flat pasta for ravioli/manicotti.  I used a small muffin cutter to make my raviolis - place a dollop of ricotta mix slightly off center, brush edges with egg white, fold over and pinch down edges with fingers or lightly with a fork! For the manicotti, we cut rectangles to size: we bought small "toaster oven" size baking pans and determined that 5 manicotti fit nicely and made pasta sheets that were about 5" x 6".  Place dollop of ricotta mix close to one edge and roll; brush end with egg white before finally rolling closed.  Place in pan and freeze.  (Best to freeze both ravioli or manicotti: place ravioli in boiling water and boil about 8-10 minutes; manicotti in a preheated oven 425 degrees - toaster oven is perfect - and bake 25 minutes.)
Check out our pasta pictures below.  As you can see our cooking ranges from simple (Poor Man's Lasagna to "starting from scratch")....but good food is good food anyway you prepare and serve it with love!


Recipe: Poor Man's Lasagna

There is nothing "poor" about this lasagna!  In fact, it is an easy, one-pot meal that serves a crowd in little time.
Years ago, when we lived in rural upstate NY, my mother-in-law told me about a recipe called Poor Man's Lasagna.  It called for some ingredients that didn't quite sound so appetizing, so together we came up with the following dish.  When I did make it during those cold days in update NY, we were four - but the two teenage boys ate enough for two more!
What you need:
  • A large Dutch oven or very large stock pot with lid plus a pot to cook the noodles
  • 1lb ground beef
  • 1 onion, finely chopped
  • 2 Tablespoons olive oil
  • 3 Tablespoons chili powder
  • 16-oz can tomato sauce  (have an extra 8oz can handy in case you want more "gravy" during the cooking)
  • 1 bag (12oz?) wide egg noodles (We like the "wide curly" noodles!)
  • 16 oz Mozzarella cheese grated
  • 8oz Ricotta cheese (you'll use about 1/2 or 3/4)
Begin:
  1. Medium heat: Lightly brown the ground beef in the olive oil, then add the chopped onions and cook.
  2. Sprinkle the chili powder and blend well.
  3. Add the 16 oz can of tomato sauce and stir, cover. Let simmer about 15-20 minutes. (If needed you can add a little more tomato sauce)
  4. Put the water on for the noodles.
  5. Grate the Mozzarella cheese (unless you cheated and bought already shredded!) Be sure to set aside about 1/3 of the shredded cheese to finish off the recipe.
  6. When the water is boiling, add a little salt with the noodles.  (They cook quickly)
  7. When the noodles are done (don't over cook them!), drain and place into the simmering meat sauce.
  8. Toss very well.
  9. Add handfuls of mozzarella cheese and large dollops of ricotta cheese to the noodle/meat mix and swirl around to blend.  Turn off the heat but keep the pot on the stove.  Add the remaining mozzarella cheese on top and cover to let the cheese melt.
Set your table, put a potholder on the table and bring out the quickest lasagna you've ever made!  Top off each serving with grated Parmesan cheese.  Good heavens, I'm not even hungry and my mouth is watering for this old-time favorite!
Enjoy!
Fifi


Recipe: Baked Lemon-Pepper Chicken Breast

As the chicken bakes it will fill your kitchen with a delightful aroma!
What you need for 2 servings:
  • 2 split chicken breasts (1/2 breast per person)
  • 1 Tablespoon butter cut into 4 pieces
  • 1-2 Tablespoons of olive oil
  • Zest of 1 Lemon
  • 1 teaspoon peppercorns (or 3/4 teaspoon ground black pepper if you don't have a coffee/spice grinder)
  • 1 teaspoon onion powder
  • 1/2+ teaspoon salt
Pre-heat the oven to 375 degrees, set rack in the middle.  Lightly coat the bottom of your baking dish with olive oil.
Rinse well and pat dry the chicken breasts.  For each piece of chicken: Create a pocket between the skin and the meat.  Using your finger lift the skin off the breast gently and place one piece of the butter at the far end and a second piece midway.
Carefully dab the chicken breasts with the olive oil (you can use a paper towel).  Place into your baking dish.
Now, zest the lemon.  I have an old grater box that I use, but a zester is a great kitchen tool.   Set aside.
Take the peppercorns and place into your coffee/spice grinder (I don't grind coffee in mine!) and grind into a coarse powder.  Add in the lemon zest.  Grind/pulse a few times to blend together.  Place in a small bowl and add the onion powder and the salt.  Stir well.  If you are using ground black pepper, then just add all the ingredients together.
Sprinkle 1-2 teaspoons of the seasoning mix onto each of the chicken breasts (top and sides as best you can)  The remaining seasoning mix can be used to make a gravy once the chicken has finished baking! (Or if you are not making the gravy, just coat the chicken lots!)
Place chicken in oven and bake for 1 hour, or until juices run clear when pierced.
Remove cooked chicken from baking dish, set on plates and serve with side veggies!  (We had brocoli and "mashed" caulifower to enjoy with the gravy!)
Optional Gravy:  Spoon out some of the oil/fat from the baking dish and make a gravy adding in the remaining lemon-pepper-onion powder-salt mix.  Place baking dish over heated stove top (cermaic cook top is OK, gas stoves be very careful!). Add 2 Tablespoons of heavy cream (or 1/2 and 1/2) with 1 Tablespoon Dijon mustard (regular mustard does NOT work).  Whisk very, very well over heat until it begins to bubble. Remove and pour into a small pitcher/gravy bowl.
Enjoy!
Fifi

Recipe: Veggie Frittata with Italian Sausage

This veggie frittata with Italian sausage is a simple but delicious one pan meal!   My husband made this for the two of us and it was quick and easy.
What you need:
  • Oven proof frying pan (metal handles)
  • 1 Tablespoon olive oil
  • 1/2 lb Italian sausage (in casing or loose)
  • 1 each: red pepper, green pepper, onion all cut into small pieces
  • Handful of mushrooms, cut into very thin slices
  • 5 eggs
  • Shredded cheddar cheese (store bought pre-shredded is great)
  • Salt and pepper to taste
Preheat oven to 325 degrees
Remove the Italian sausage from of its casing (better if you can buy loose Italian sausage); we used a hot Italian sausage to really spice up the flavor.  Add 1 Tablespoon olive oil to the frying pan and spread about to coat.  Brown the loose sausage over medium heat.
While the sausage is browning, cut up into small pieces a green pepper, a red pepper, a small onion, and a handful of mushrooms if you have them on hand.  (We didn't this time around)
When the sausage is browned, add the veggies in and toss to blend well with the sausage and all the flavorings in the pan.  As they cook up, get your eggs ready.

Scramble/whisk 5 eggs in a bowl and then pour over the sausage & veggies.  Tilt the frying pan so the egg spreads evenly (or as best as can be). As the eggs start to cook up, get your shredded cheese ready.
Sprinkle the shredded cheddar (or jack cheese) over the egg/sausage/veggies and now place the frying pan into the oven (325 degrees) for about 5-10 minutes or until the cheese melts then move it under the broiler to brown and crisp up the cheese.
CAREFULLY (using non-skid pot holders/gloves) remove the frying pan and serve up.  We cut the frittata into quarters: it is easier to serve a smaller piece and they fit a bit nicer on a plate!  The other pieces will keep warm since the frying pan is oven-hot!

(Another option is to cover the skillet and place in oven; this will cause the frittata to "rise" and become puffy...looks elegant!)
Enjoy!